Read the following Order Guide – Door and Window Canopy Kits to discover important information about our product options, how to measure your spans, standard door and window canopy kit window widths, a pre-order checklist of what information you need to have ready before you order, links to installation guides and more.
Jump to section:
- Door and Window Canopy / Window Awning Order Options
- Before You Order – How to Measure Your Door or Window Spans
- Standard Door and Window Canopy / Window Awning Widths
- Pre-Order Checklist – What You Need to Have Ready Before You Order
- Installation Information and Where to Get Help
- Frequently Asked Questions, Ordering Information and Policies
Door and Window Canopy / Window Awning Order Options
Choosing the Profile
When determining which style of bracket profile suits best, please consider:
- 30° suits east and south facing windows as it lets in more light, but still protects from weather
- 45° suits north and west facing windows as it blocks more light, especially in the afternoon
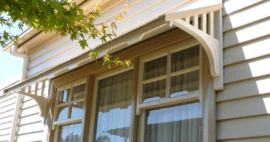
- 15° door canopy suits most doors and is designed to have a screen door open inside the protected area
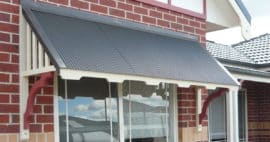
Choosing the Type of Roofing Iron
We recommend Mini Orb corrugated ripple iron, as the regular corrugated iron looks rather bulky on a straight window canopy.
Note that the bullnose and half-bullnose door and window awning profiles are only available in regular corrugated iron due to the curve required to match the profile.
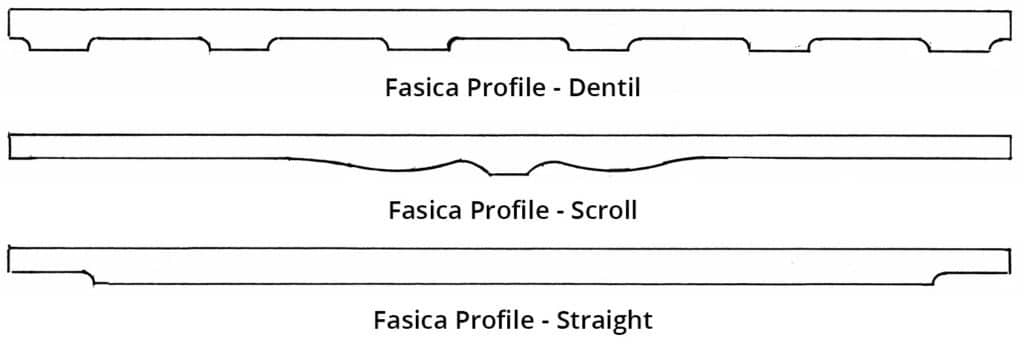
Choosing the Fascia Plate
Note that not all window canopy kits come with a fascia plate included – profiles BD and BC are excluded as they are too close to the window. Door canopy kits do not include a fascia plate, but we can supply them as a separate item with your order upon request.
Before You Order – How to Measure Your Door or Window Spans
Important considerations when measuring your window or door to determine the width:
- Measure your window frame outside to outside
- Match your width to the widths listed below. For example, if your window frame is 2300mm wide, then specify a 2300mm wide kit when you place your order. The width of the kit refers to the internal dimension between the brackets. If you prefer to locate the end brackets away from the window frame, order the next width up
- For window frames wider than 3200mm, it’s important that you ensure there is a place where an additional middle / central bracket can be fixed to the wall or window frame
Standard Door and Window Canopy / Window Awning Widths
Lyrebird door and window canopy / window awning kits cover openings at the following standard widths:
750, 1100, 1600, 1900, 2300, 2700, 3200mm
For the bullnose and half-bullnose profiles, standard door and window opening widths are:
1450, 2300, 3000, 3700mm
Pre-Order Checklist – What You Need to Have Ready Before You Order
When ordering your window canopy kit, please have the following information decided and at hand:
- How wide is your door or window frame? – Make sure that you’ve read through the measuring guidelines above closely before placing your order.
- If you’re fixing the brackets away from the door or window frame, have you made sure you’re ordering the next size up?
- If your window frame is wider than 3200mm, have you accounted for ordering an additional end bracket to affix in the middle of the span?
- What will it be attached to? – We need to know if the door or window canopy / window awning is going to be attached to a brick or timber wall, so that we can provide you with the appropriate wall fixings.
- What colour and type of colorbond would you like? – Choose the colour of your window canopy roof and flashing from the BHP Colorbond colour chart. Mini Orb ripple iron or Blueorb standard corrugated iron are available in all these colours. View the Colorbond Color Chart
- Which fascia plate profile will look best on your window canopy – Dentil, Scroll or Straight?
- If you’re ordering a door canopy and want to add a fascia plate, you will need to order via a separate order
Installation Information and Where to Get Help
Full installation instructions will be provided when your new window canopy / window awning or door canopy arrives. We strongly recommend that you read through these closely to ensure you understand the process and what’s required before making a start. You can also read – How-to Install a Lyrebird Window Awning / Window Canopy
Here’s some installation tips our customers have found useful throughout the years:
- Often the canopy (if it is not too wide) can be fully assembled at ground level, and then mounted to the wall in its designated place
- Due to the LOSP treatment, an oil based primer needs to be used before applying acrylic paint – make sure you account for this before putting the components together
We’re real people and we have the expertise to help! We can provide you with personal installation support and talk you through any issues or questions you may have when putting it all together – just reach out via one of the options below:
- Call us on (03) 9707 4300
- Email sales@lyrebirdverandahart.com
- Complete our online Contact Us form