If you’re new to bullnose verandahs, you may not be familiar with the bullnose verandah essentials – the terms we use or key components of verandah measurement and construction. Use this handy list of informative definitions and description of key components and where and how they fit into the overall layout to familiarise yourself as you plan your bullnose verandah project.
Verandah width
The measurement between the wall of the house and the front edge of the verandah (ie. where you want the verandah to end). The width of the verandah will determine the size of the verandah rafters – i.e. the wider the verandah, the larger the rafter size to span the distance. Refer to the Bullnose Verandah Rafters – Quick Reference Guide below, which shows the relationship between standard verandah widths and minimum rafter size.
Verandah length
The measurement along the total length of the verandah inclusive of corners. Where the verandah goes around a corner of the house, both internal and total lengths are required to draft a verandah rafter plan. The length of the verandah will determine the spacing of the post supports and rafters and number of roofing sheets required.
Verandah height
Comprised of two measurements, roof height being the more key in determining rafter radius:
- Roof height – the measurement vertically from the top of the verandah beam to the point the rafters connect to the house. The roof height will help us determine the minimum radius of your verandah rafters and we will advise how much the front height will be when we supply the quote. Note that in most instances if you need more front height, rafter radius can be adjusted with no change in price.
- Front height – the measurement from the top of the verandah flooring to the underside of the fascia beam. A minimum of 2050mm clearance is required to accommodate any verandah. If you feel you have limited height available, please let us know.
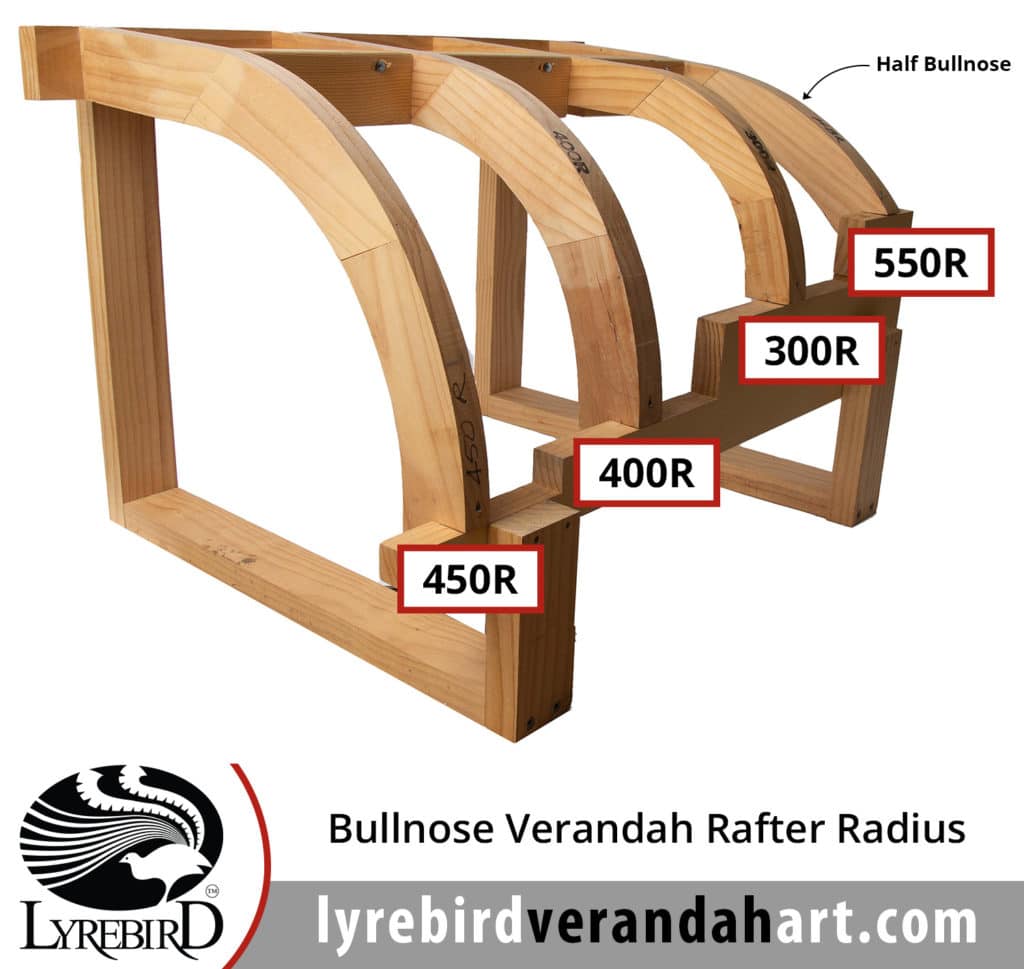
Rafter radius
The measurement from the center of the curve to the centre of the circle it forms. The smaller the radius, the tighter the curve. The height of the verandah will determine the radius of the rafter curve. The less height available, the greater the radius.
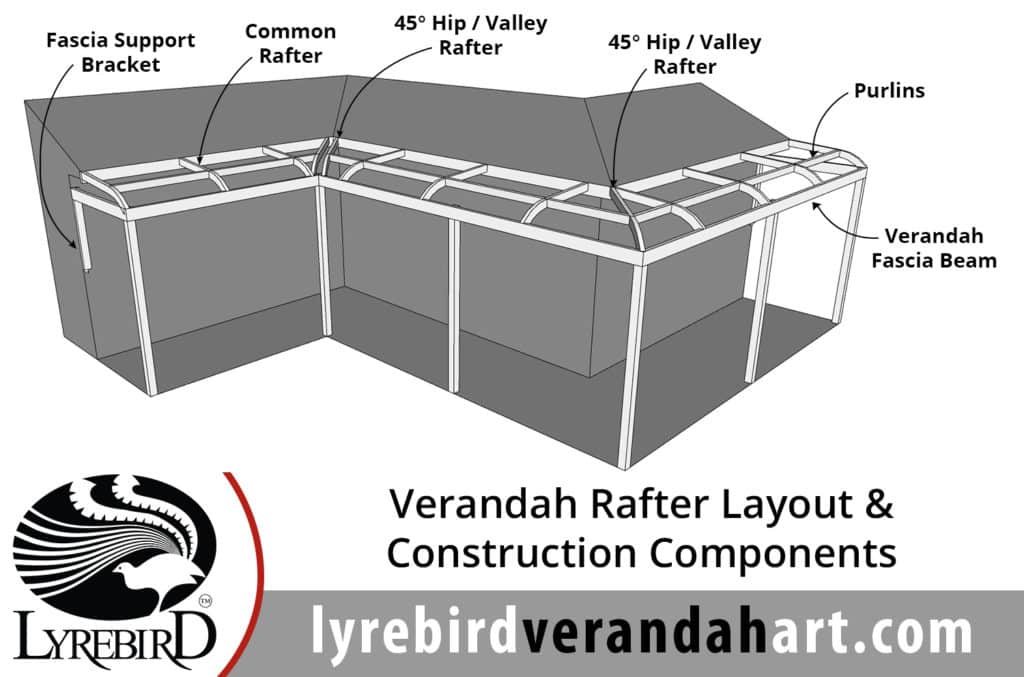
Verandah rafters
Available in a variety of profiles, radius and lengths, the verandah rafters support the roof iron and resist wind updraft. Verandah rafters affix at the house end to a wall plate via a joist hanger, and at the front end to post supports and/or a fascia beam. The notched section at the curved end of a bullnose rafter is called a ‘birdsmouth notch’ – cut this way so that the rafter will sit snugly onto the top of the fascia beam. Hip rafters require the extended end to be cut flat at the top of the birdsmouth notch so that the hip can sit squarely on top of the corner post.
Rafter length
Measured on the diagonal from end to end. Lyrebird’s rafters are supplied longer than the standard width of the verandah to take into consideration the curved radius and roof pitch. Lyrebird’s verandah rafters assume a standard 5 degrees roof pitch, although deeper pitches can be accommodated. Complete our Request a Quote form, specifying your requirements and we’ll get in touch with you to discuss further.
Hip corner
Bullnose verandahs wrap around external corners or rectangular verandah ends with a hip corner, giving it an aesthetically pleasing finish and protecting the side edge of the house or verandah that would otherwise be exposed. A single hip verandah rafter is positioned from the corner edge of the outer verandah corner post at a 45 degree angle to either the corner of the house (for external corners) or to the house wall (for rectangular verandah ends).
Valley corner
For internal corners of your home, two valley verandah rafters are positioned at a 45 degree angle from either side of the internal corner 100mm apart, and extend to the post on the outer edge of the verandah.
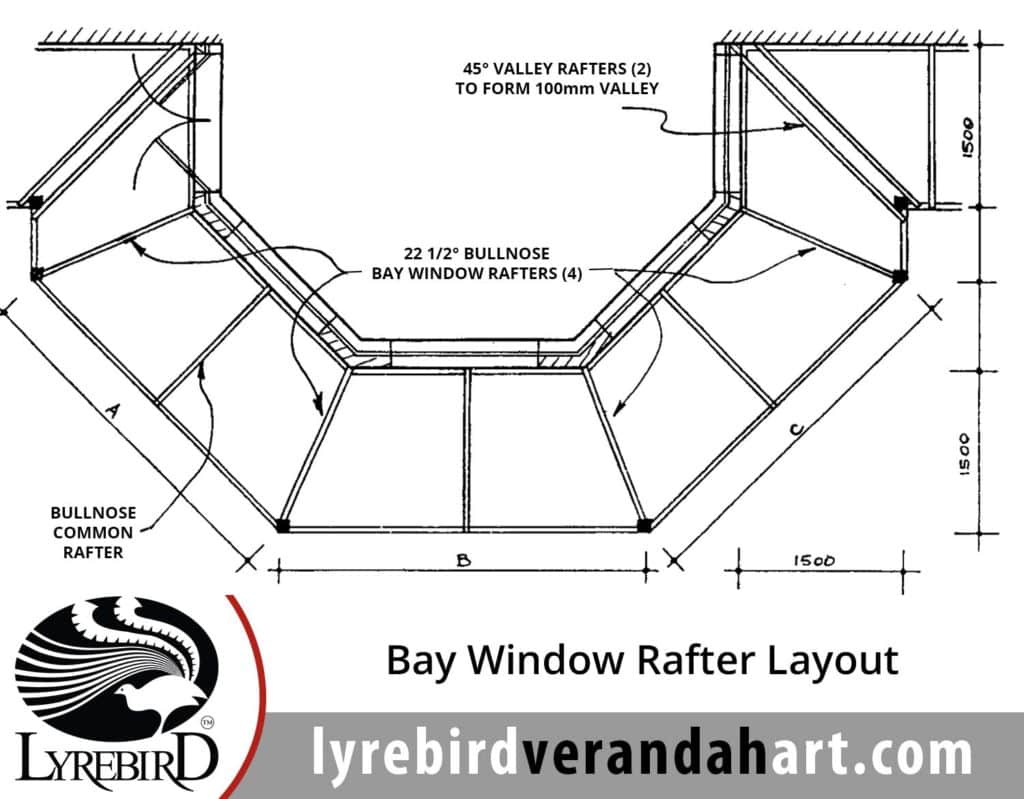
Bay windows
Bay window designs have softer corners than the 90 degree hip corners and as such, use a 22 ½ degree angled verandah rafter, available with all of Lyrebird’s verandah rafter profiles. A single 22 ½ degree hip rafter is positioned at each of the four corners of a traditional bay window design and typically has a common rafter positioned between each hip. The internal corners on either side of the bay window use a standard 45 degree valley, as outlined above.
Fascia beam
The fascia beam supports the verandah rafters on the outer edge of the verandah width and is supported by timber posts at regular intervals. The size of the fascia beam is determined by the width of the verandah and some large spans may require hardwood or Laminated Veneer Lumber (LVL) beams. The fascia beam is notched into the top of the timber posts, leaving a flush outer edge, and the birdsmouth cut of the bullnose rafters sit on top and are attached via the timber extension on the inside of the verandah.
Turned and fluted posts
Available in a variety of turned or fluted profiles, posts support the weight of the fascia beam and by extension, the verandah roof. The size of the posts are determined by the width of the verandah, as the greater the span, the greater the load.
Post support
The means by which the post is fixed or supported at its base. Typical options include:
- Into Stirrups (Existing Concrete)
- Into Saddles in Concrete Footings
- Into Brick Piers
- Into Concrete Footings in the Ground
- Fixed to the Decking
Whichever one you choose to use, it’s important that you share it with us when you order so that we can take it into account when recommending the height of your posts.
Learn more (PDF) – Post Anchor Guide – by Pryda
Purlins
Purlins sit at a 90 degree angle between the rafters and provide additional strength and support to the verandah roof. We recommend using purlins between the rafters over battens that sit on top of the verandah rafter. Purlins provide greater strength and prevent sideward movement. Using battens also means the rafters need to be spaced closer together, increasing the cost of your project. The width of the verandah will determine how many rows of purlins are required. For the majority of standard sizes, there should be at least two rows of purlins. The first positioned along the rafter just before the curve starts to dip down, and subsequent rows of purlins at no greater than 900mm spacing.
Bullnose Verandah Rafters – Quick Reference Guide
| Standard Verandah Widths | Available Corner Radii | Minimum Rafter Size |
| 1200 | 300R, 350R, 400R, 450R, 550R | 90×45 |
| 1500 | 300R, 350R, 400R, 450R, 550R | 90×45 |
| 1800 | 300R, 350R, 400R, 450R, 550R | 90×45 |
| 2100 | 300R, 350R, 400R, 450R, 550R | 90×45 140×45 |
| 2400 | 300R, 350R, 400R, 450R, 550R | 90×45 – 550R Only 140×45 |
| 2700 | 300R, 350R, 400R, 450R, 550R | 140×45 |
| 3000 | 300R, 350R, 400R, 450R, 550R | 140×45 |